In this post, I will demonstrate how to set up the Odoo development environment on Windows 10 with Eclipse as the IDE. This tutorial is valid for all Odoo Versions.
- For Odoo Upto Version 10, use Python 2.7.16.
- For Odoo version 11 and onwards, use Python version 3.5 or above.
This tutorial is effective for windows with no pre-installed tools e.g. JDK, Python, or eclipse. You may skip to the next step if you have already installed any of the above-mentioned tools.
Executive Summary
- Install Python 2.7.16 (For Odoo Upto 10) & Python 3.5 (For Odoo above 10)
- Install the Postgre Database Management System
- Install JDK (For Eclipse)
- Install & Setup Eclipse
- Install PyDev
- Configure python interpreter
- Get Odoo X( X is the Desired Version) clone from Git
- Installation of prerequisite python packages for Odoo
- Setup & Run Odoo in Eclipse
- Open Odoo In Pydev Perspective Project
- Setup config file & Run configuration.
- Run Odoo from Eclipse
1. Python Installation
Download and install Python version 2.7.16 from the following link.
https://www.python.org/downloads/release/python-2716/
For Odoo above 10, install python 3.5 or above from the following link.
https://www.python.org/downloads/
After installation add the python & pip home page
Note: Don’t forget to choose the installation path in system variables.
For choosing the installation path,
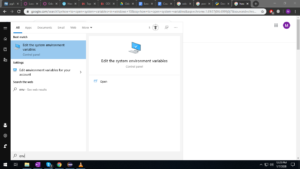
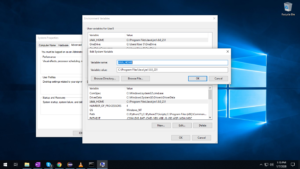
- Open “Edit the System environment variables” from the Windows StartMenu by typing “env” in the start search.
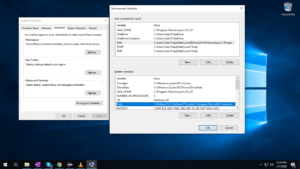
In System Properties,
- Open “Environment Variables” & double click
- After opening, “Environment variables >> SystemVariables” window as shown below,
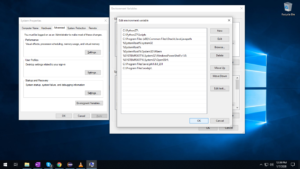
- Open the Path variable which is placed at the left side of the System Variable Window. (As shown below in the figure)
This will lead to an open “ Edit Environment variable” window. Click ‘New’ and edit your Python installation path and the path to the Scripts folder in the Python Directory ( both separately).
Example: Here is an example, I have chosen (C:\Python27, and C:\Python27\Scripts)
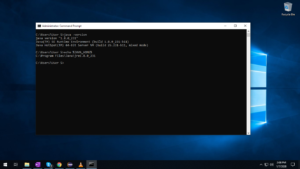
After that to check your installation,
- Open cmd/powershel.
- Type python –version and hit enter, It will show your installed python version.
Then to check the pip version,
- Type pip –version to check if it is installed and ready to use (As shown in the figure below)
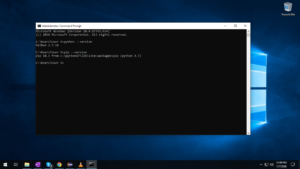
You will observe whether the versions are ready to use, If not, please check if the path is configured correctly in the system variables.
2. PostGre Installations
Download and install PostgreSQL DBMS from the following link.
https://www.postgresql.org/download/windows/
After installation,
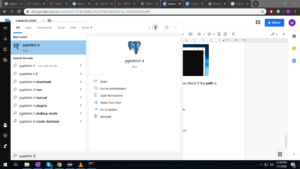
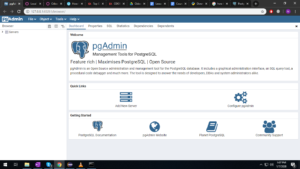
- Run pgAdmin 4 from Start Menu to start the database server.
- It will open in a default browser or if you are opening it for the first time, it may ask you to choose the browser for opening the interface.
- Select your browser (if it asks)
- After the selection of the browser, the server will start running.
- After getting loaded in the browser it will ask password as an initial popup.
- The password by default is “admin” and can be changed afterward.
Note: The password is required every time when the server run or re-run or when the server is restarted after shutting down.
3. JDK Installation
Download and install Java Development Kit from the following link.
https://www.oracle.com/java/technologies/javase/javase-jdk8-downloads.html
- Add the JAVA_HOME as a new variable with the name JAVA_HOME in the System Variables.
- Value the added variable as the path of your java installation. Also, add the installation path to the system variable path.
Example: Here, I have chosen the java home path is (C:\Program Files\Java\jre1.8.0_231) and the same is configured in the system variable path.
For checking if the JDK installation was successful and the variables are configured correctly,
- Open cmd/powershell and Type java -version and echo %JAVA_HOME%
If you get the following output the JDK is installed and configured correctly.
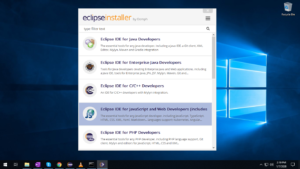
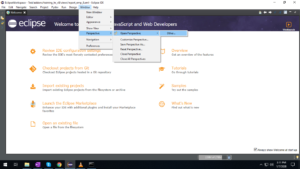
4. Install & Setup Eclipse
Download and install Eclipse from the following link.
https://www.eclipse.org/downloads/
From Eclipse installer choose the “Eclipse IDE for javascript and web developers(…)”. As shown below.
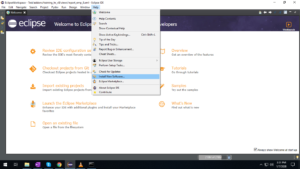
Install PyDev
After Eclipse is installed,
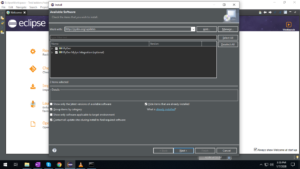
Open, Select Help >> Install new Software to install PyDev
- In the Install window, Type “http://pydev.org/updates” in the Work with the It would show you the available PyDev.
- Select Both options as shown below, and Complete the Installation by clicking Next. (Note: if asked for license agreement prompts, agree and complete the installation process).
Configure python interpreter
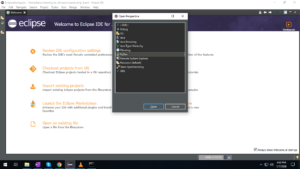
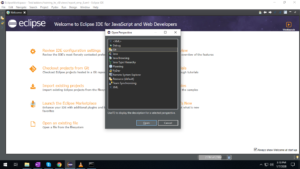
Now, the next step is to Setup eclipse’s Perspective to work with Python.
Click Window -> Open Perspective -> Other and from the Window Select Pydev and Click OPEN. (as shown in the figure below,
The next step is to set up the Interpreter for python.
- For doing it, Click Windows -> Preference and In the Left Pane,
- Select Pydev and the Interpreter Python
- Then on the Right side click the “Browse for python/pypy exe”, and select the python from the installed path. Click Apply and the System will automatically detect Your python version and setup paths and rest of environment variables.
- Click OK to Close this Windows once the eclipse is done setting up Environment.
Note: The process is shown in the figure below.

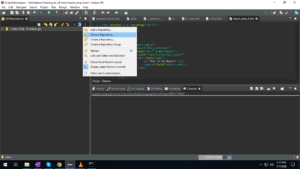
5. Get Odoo from Git using Eclipse
Now we need to setup the GIT repository in order to download Odoo Source code.
- To do so, in Eclipse Click Windows -> Open Perspective -> Other (As shown in the figure below).
- In the next window select Git and click OPEN.
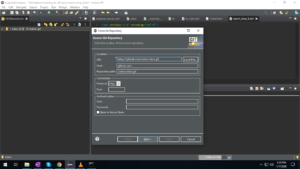
- In Git perspective select “Clone a Repository”. If you have no repository, you might see “Clone a Git Repository” option right in the middle of Git Repositories window, click that.
- On the next window fill the URI field with “https://github.com/odoo/odoo.git“ as shown below. The Rest of the Fields will get auto-fill. Click Next.
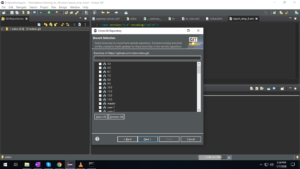
The following will ask you to select the version you want to clone.
- Click “Deselect All” and then Select the Odoo version you want to clone and press Next.
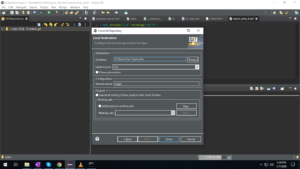
The following window would ask for the Local Destination.
- Set a directory manually. Keep in mind it would be used in setting up Odoo prerequisite packages and for Opening Odoo in PyDev perspective project, So consider selecting the path manually.
Click Finish and it will clone the Odoo selected version in the specified directory. (Note: It may take some time as downloading is involved.)
6. Installing Prerequisite python packages for Odoo
First of all Install psycopg using the installer here: http://www.stickpeople.com/projects/python/win-psycopg/
Modify the requirements.txt file, this file is present in the main directory of Odoo Version cloned from Git in the previous step.
To edit the requirements.txt file do the following:
- Remove psycopg2 as you already have it.
- Remove the optional python-ldap, gevent and psutil because they require compilation.
- Add pypiwin32 because it is a requirement of windows.
Then, Use pip to install the dependencies using the following command from a cmd/powershell prompt (replace \YourOdooPath by the actual path where you have downloaded Odoo, also change your pip path if it is different.).
C:\> cd \YourOdooPath
C:\YourOdooPath> C:\Python27\Scripts\pip.exe install -r requirements.txt
7. Setup & Run Odoo in Eclipse
Open Odoo In Pydev Perspective Project
Now for importing the Odoo source code into Eclipse
- Click File -> Pydev Project.
- In project name, Type odoo (or any name as a project title).
- Uncheck Use Default and click Browse and select the source directory where the Odoo is cloned as shown below and click Finish.

Setup config file and Run configuration
Now Open the config file of Odoo from its debian directory and fill the attributes as shown below,
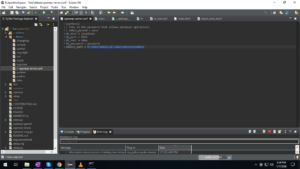
[options]
This is the password that allows database operations:
admin_passwd = admin
db_host = localhost
db_port = 5432
db_user = odoo
db_password = pass
addons_path = D:\odoo\addons,D:\odoo\openerp\addons
- Here db_user is referred to the database user you have created in Postgresql server, and db_password referred to as its password.
- It must be noted to set addon_path in accordance with the Odoo directory that differs for each user.
(Note: For some users, it shows errors when the file is placed in Disk C. So try changing file location.)
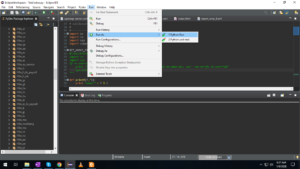
As the config file is setup. Next is to Setup Run configuration, for doing it
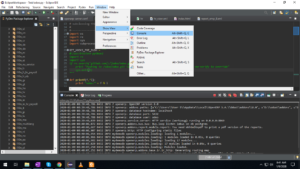
Click Run in the menu and select Run configuration.
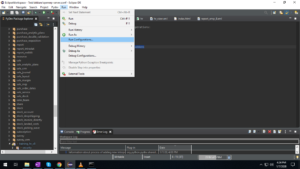
In Run Configuration windows as shown in the figure,
- Under Python run (at the left side)
- Select your project by clicking on Browse in Main Tab. As soon as you will select the project, the “Project” & “ Main Module” field will get filled automatically.
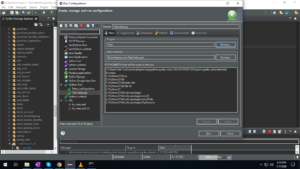
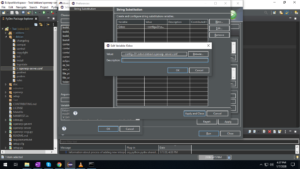
- After that Click on Arguments Tab in the same window and click Variables in the Program Argument section under the tab ( As shown in the figure).
- Press Edit Variables on the next window.
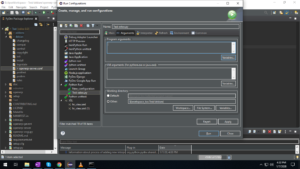
- Now add a new variable with any name but the value must be in the following format:
–config=D:\odoo\debian\openerp-server.conf
Here the path is of the configuration file that we have just configured.
- Now click Apply and Close.
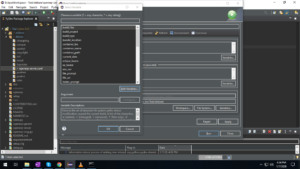
- In the earlier Select Variable Window (shown in figure 3).
- Add this newly created variable by typing its name and double-clicking it in the Select Variable window.
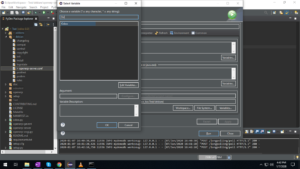
Now it will show in the Program argument as ${Odoo} symbol (As shown in the figure below).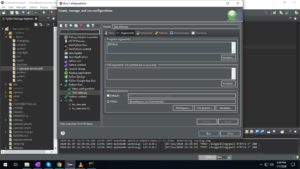
Now the Run configuration is completed. Now we need to Run the Odoo From Eclipse that is connected to the Running Database server of Postgre and is running the python using PyDev Perspective.
Run Odoo from Eclipse
Now run the project from the menu.
The server will start running as shown below.

Look at the log in the console window. If not found, activate the console window from the menu Window >> Show View >> Console. (As shown in the figure below)
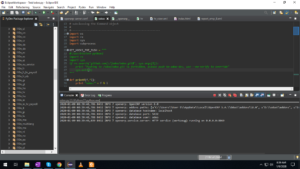
Now as the server is running successfully. Open any web browser and Type the address localhost:8069 to get the web interface up and running
The Screenshot of running Odoo environment is shown below.
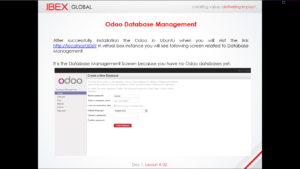
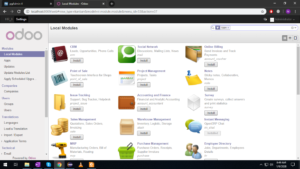
After creating a database the dashboard would change to the following which is shown in the screenshot below.
The address port is mentioned in the Console log as well when the server is run

That’s it, the Odoo Development environment is configured and ready in windows with Eclipse (PyDev).